Simple kernel modules are a good way to get acquainted with writing programs in the kernel space. But as embedded programmers we eventually would like to interact with peripheral sensors through interfaces like I2C and SPI. One such sensor which I have tried to work with and explain more about in this article is the BME280 sensor which measures pressure, temperature and humidity.
For this example, I have only performed the temperature measurement and exposed the same through a sysfs interface.
The Sensor
The BME280 provides an I2C interface for reading and writing data. For this demo you will need to hook it up to the I2C pins on your Embedded Linux board like the Raspberry Pi which I have done in my case.
Operation
A few basic operations in your sensor initialization would be to verify the device id and reset the sensor before usage.
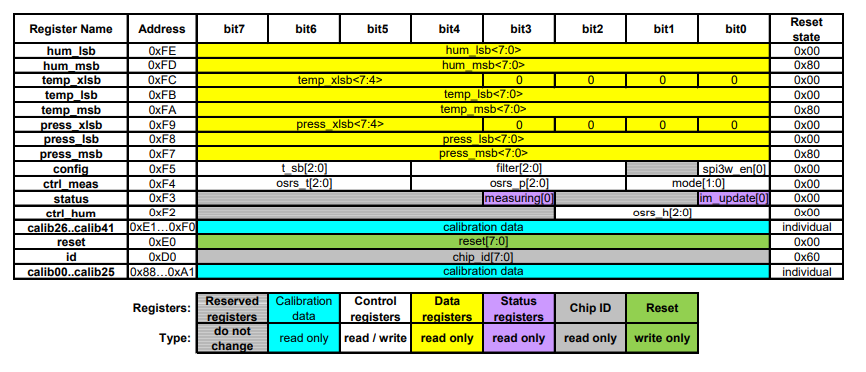
The BME280 output consists of the ADC output values. However, each sensing element behaves differently.
Therefore, the actual pressure and temperature must be calculated using a set of calibration parameters.
For temperature calibration there are three parameter which are used for the final temperature calculation. The reference manual provides a code snippet demonstrating the same.
// Returns temperature in DegC, resolution is 0.01 DegC. Output value of “5123” equals 51.23 DegC.
// t_fine carries fine temperature as global value
// dig_T1, dig_T2, dig_T3 are the calibration parameters.
BME280_S32_t t_fine;
BME280_S32_t BME280_compensate_T_int32(BME280_S32_t adc_T)
{
    BME280_S32_t var1, var2, T;
    var1 = ((((adc_T>>3) – ((BME280_S32_t)dig_T1<<1))) * ((BME280_S32_t)dig_T2)) >> 11;
    var2 = (((((adc_T>>4) – ((BME280_S32_t)dig_T1)) * ((adc_T>>4) – ((BME280_S32_t)dig_T1))) >> 12) *
    ((BME280_S32_t)dig_T3)) >> 14;
    t_fine = var1 + var2;
    T = (t_fine * 5 + 128) >> 8;
    return T;
}
The config register sets the rate, filter and interface options of the device. I have set it to disable the SPI and IIR filter.
The raw temperature values are captured in the temp_msb, temp_lsb and temp_xlsb 8-bit registers. These values need to be bit shifted to form the final 32-bit value.
The ctrl_meas register sets the pressure and temperature data acquisition options of the device. It also controls the operating mode of the sensor. I have configured it be used in forced mode.
In forced mode, a single measurement is performed in accordance to the selected
measurement and filter options. When the measurement is finished, the sensor returns to sleep
mode and the measurement results can be obtained from the data registers. For a next
measurement, forced mode needs to be selected again.
So each time I try to read the sensor, I have to configure ctrl_meas register to enter forced mode.
Setup
On Raspbian for the Raspberry Pi the I2C is disabled by default. This can be enabled through the raspi-config under interfacing options.
sudo raspi-config
The board needs to be rebooted to take effect. To verify if the sensor is detected on the bus, i2c-tools can be used.
$ sudo apt-get install -y i2c-tools
$ i2cdetect -y 1
     0  1  2  3  4  5  6  7  8  9  a  b  c  d  e  f
00:          -- -- -- -- -- -- -- -- -- -- -- -- --
10: -- -- -- -- -- -- -- -- -- -- -- -- -- -- -- --
20: -- -- -- -- -- -- -- -- -- -- -- -- -- -- -- --
30: -- -- -- -- -- -- -- -- -- -- -- -- -- -- -- --
40: -- -- -- -- -- -- -- -- -- -- -- -- -- -- -- --
50: -- -- -- -- -- -- -- -- -- -- -- -- -- -- -- --
60: -- -- -- -- -- -- -- -- -- -- -- -- -- -- -- --
70: -- -- -- -- -- -- -- 77
We can verify that the 7-bit address of the sensor is 0x77.
Kernel I2C API
A master chip is a node that starts communications with slaves. In the Linux kernel implementation it is called an adapter or bus.
A slave chip is a node that responds to communications when addressed by the master. In Linux it is called a client.
- i2c_get_adapter: Retrieves the adapter/handle for an I2C bus. For the RPi, the I2C pins are hooked to the bus 1.
- i2c_new_client_device: Creates a new I2C slave client device.
- i2c_add_driver: Adds the i2c driver struct for the slave client. The struct contains probe routine for the slave client. The adapter tries to match the strcut i2c_client client created in i2c_new_client_device with the id table in struct i2c_driver.
- i2c_smbus_read_byte_data: This reads a single byte from a device, from a designated register. The register is specified through the second argument.
- i2c_smbus_write_byte_data: This writes a single byte to a device, to a designated register. The register is specified through the second argument.
There are other SMBus routines, but I have used only a couple of them.
Result
The sysfs file /sys/kernel/bme280_demo/temperature contains the temperature reading. Each time the file is read, the kernel driver invokes the corresponding show method in the kobj_attribute.


The complete code is made available on Github.
References
- https://docs.kernel.org/i2c/index.html#writing-device-drivers
- https://cdn.sparkfun.com/assets/learn_tutorials/4/1/9/BST-BME280_DS001-10.pdf
- https://elixir.bootlin.com/linux/v6.1.15/source/include/linux/i2c.h
- https://github.com/boschsensortec/BME280_driver
- https://embetronicx.com/tutorials/linux/device-drivers/bmp280-i2c-linux-device-driver/